Why Is My Cactus Dying? Diagnose It Root to Crown
All ArticlesA dying cactus has six possible causes: root rot from overwatering, dehydration, nutrient burn, disease, etiolation, or natural corking. Start with the squeeze test on the base. A soft yield means root rot and the clock is short. The other five each have their own rescue path.
How do you diagnose a dying cactus?
Most generic care guides treat cactus death as a single problem with a single solution. It is not. Six different failure modes produce six different visible symptoms, and three of them progress fast enough that a wrong call costs you the plant in days. Work through this decision tree before you do anything else.
Start with the squeeze test, then follow the branch that fits.
- Soft and yields under pressure, base smells foul, plant lifts free of substrate. Root rot. Jump to symptom 1 below and act today.
- Firm but shriveled, ribs deeper than usual, plant feels light. Underwatering or root damage. Symptom 2.
- Body turning uniformly yellow or pale green, no localized spots. Chlorosis from pH or root damage. Symptom 3.
- Brown or black spots, hard not soft, surrounded by healthy tissue. Sunburn, fungal lesions, or pest damage. Symptom 4.
- New growth pale and elongated, narrower than the base, leaning toward the window. Etiolation from light starvation. Symptom 5.
- Brown bark-like tissue at the base, firm, slowly creeping upward over months. Corking. Not a problem. Symptom 6.
Symptom 1: Soft, Mushy Base
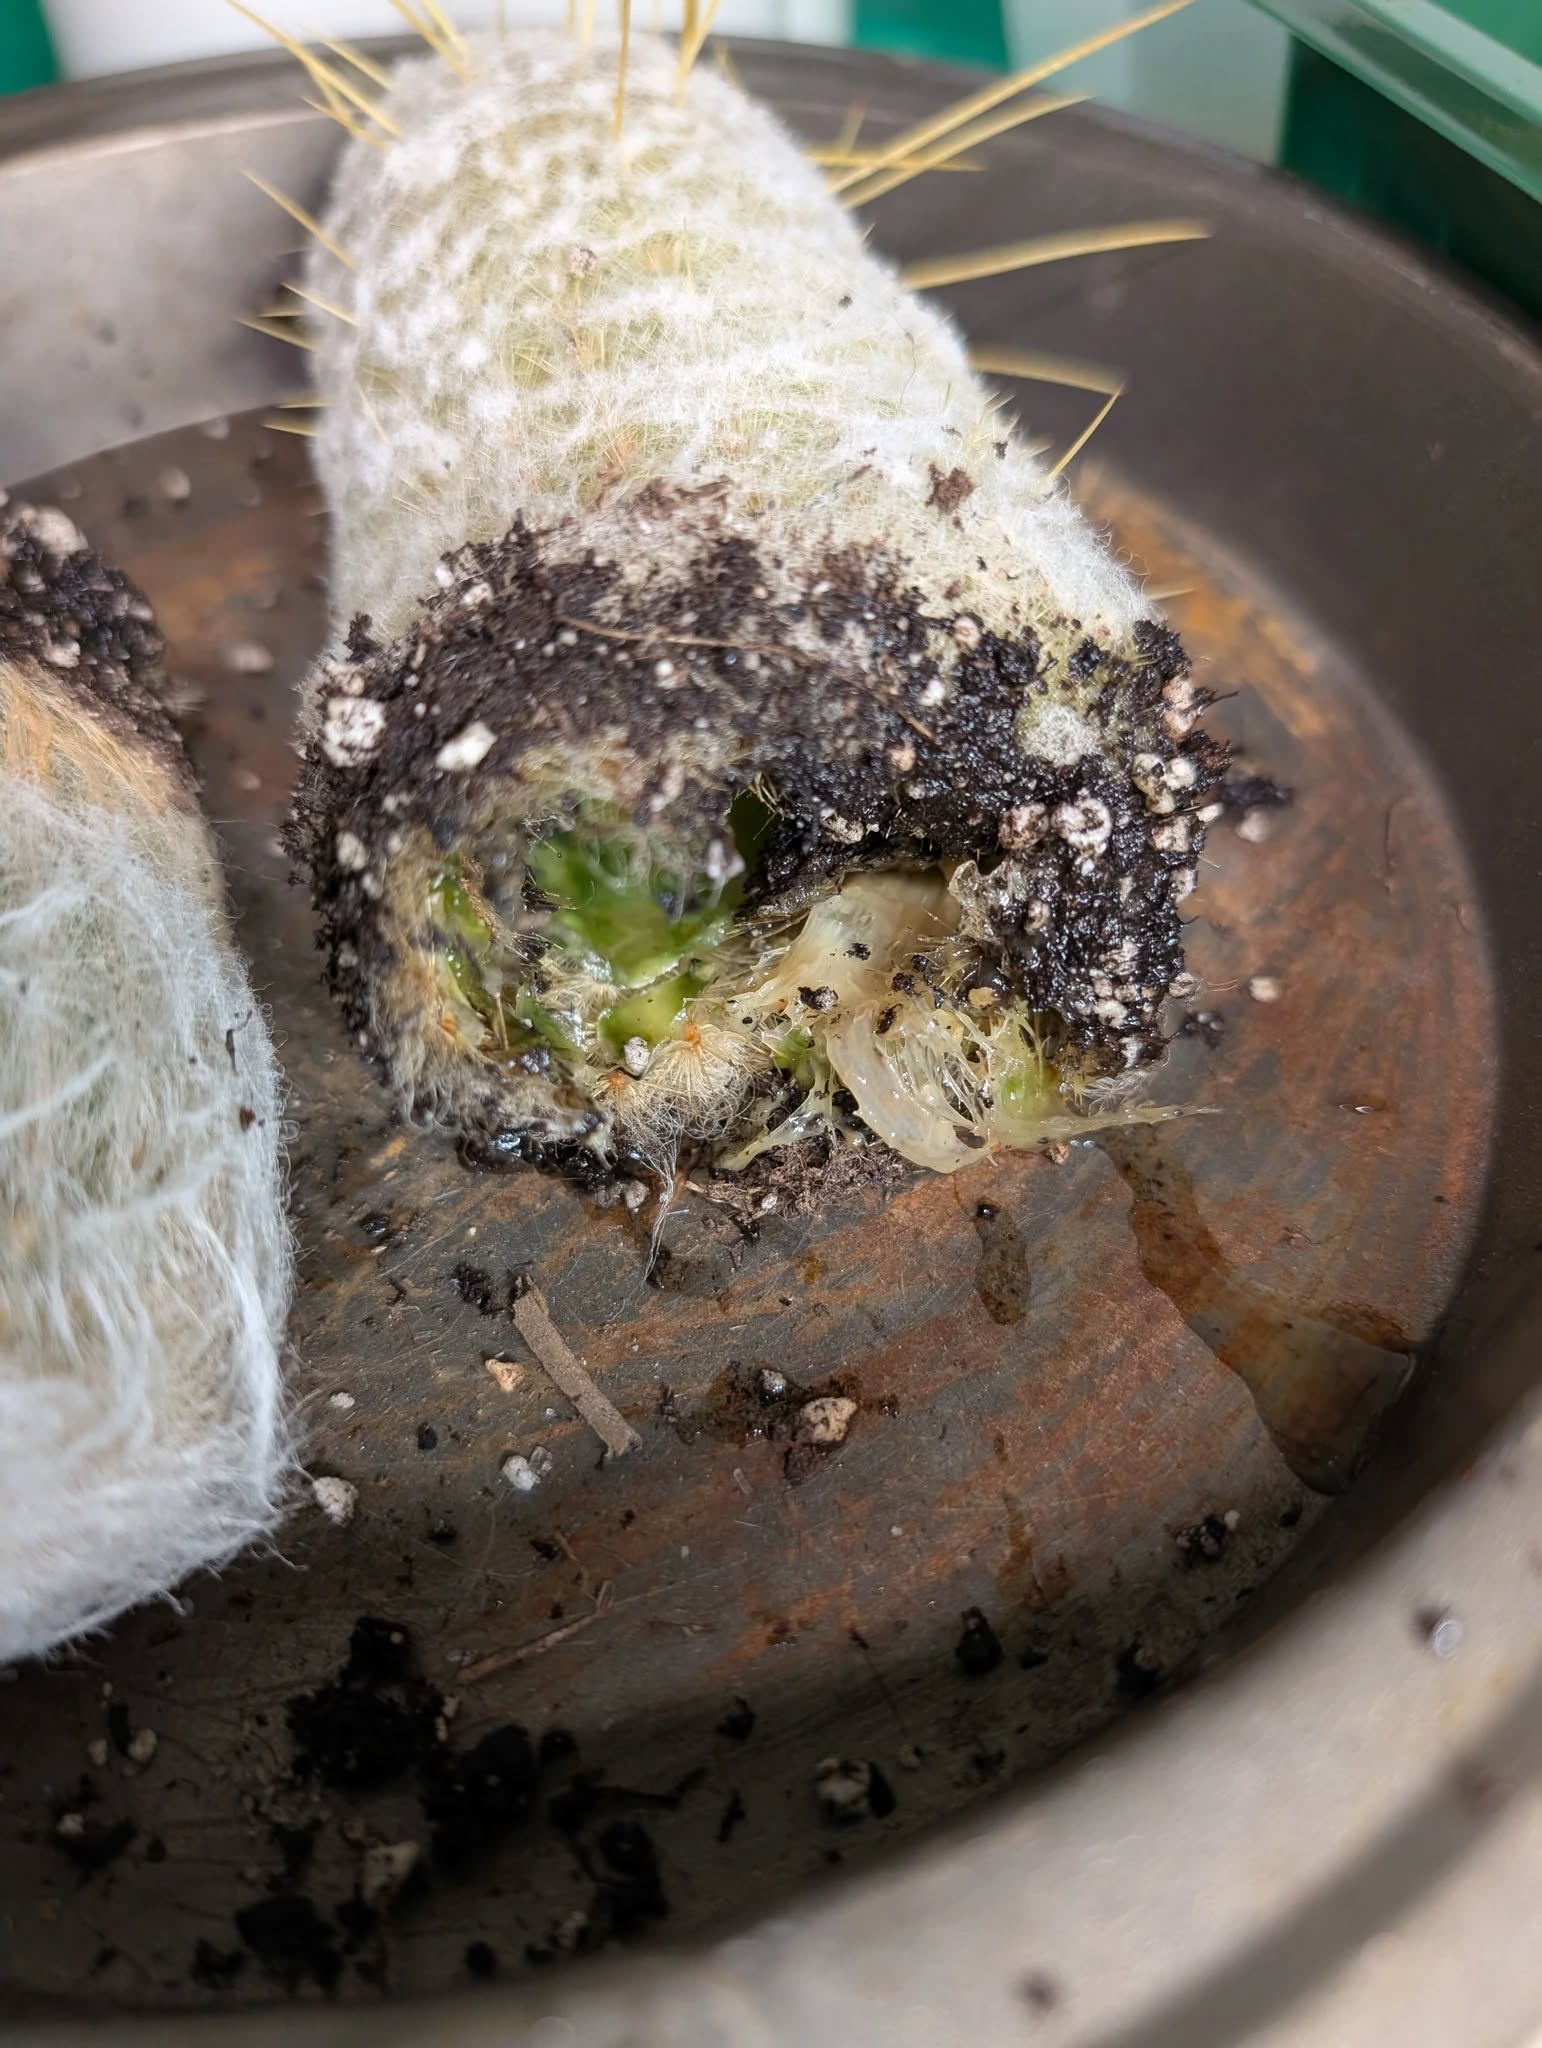
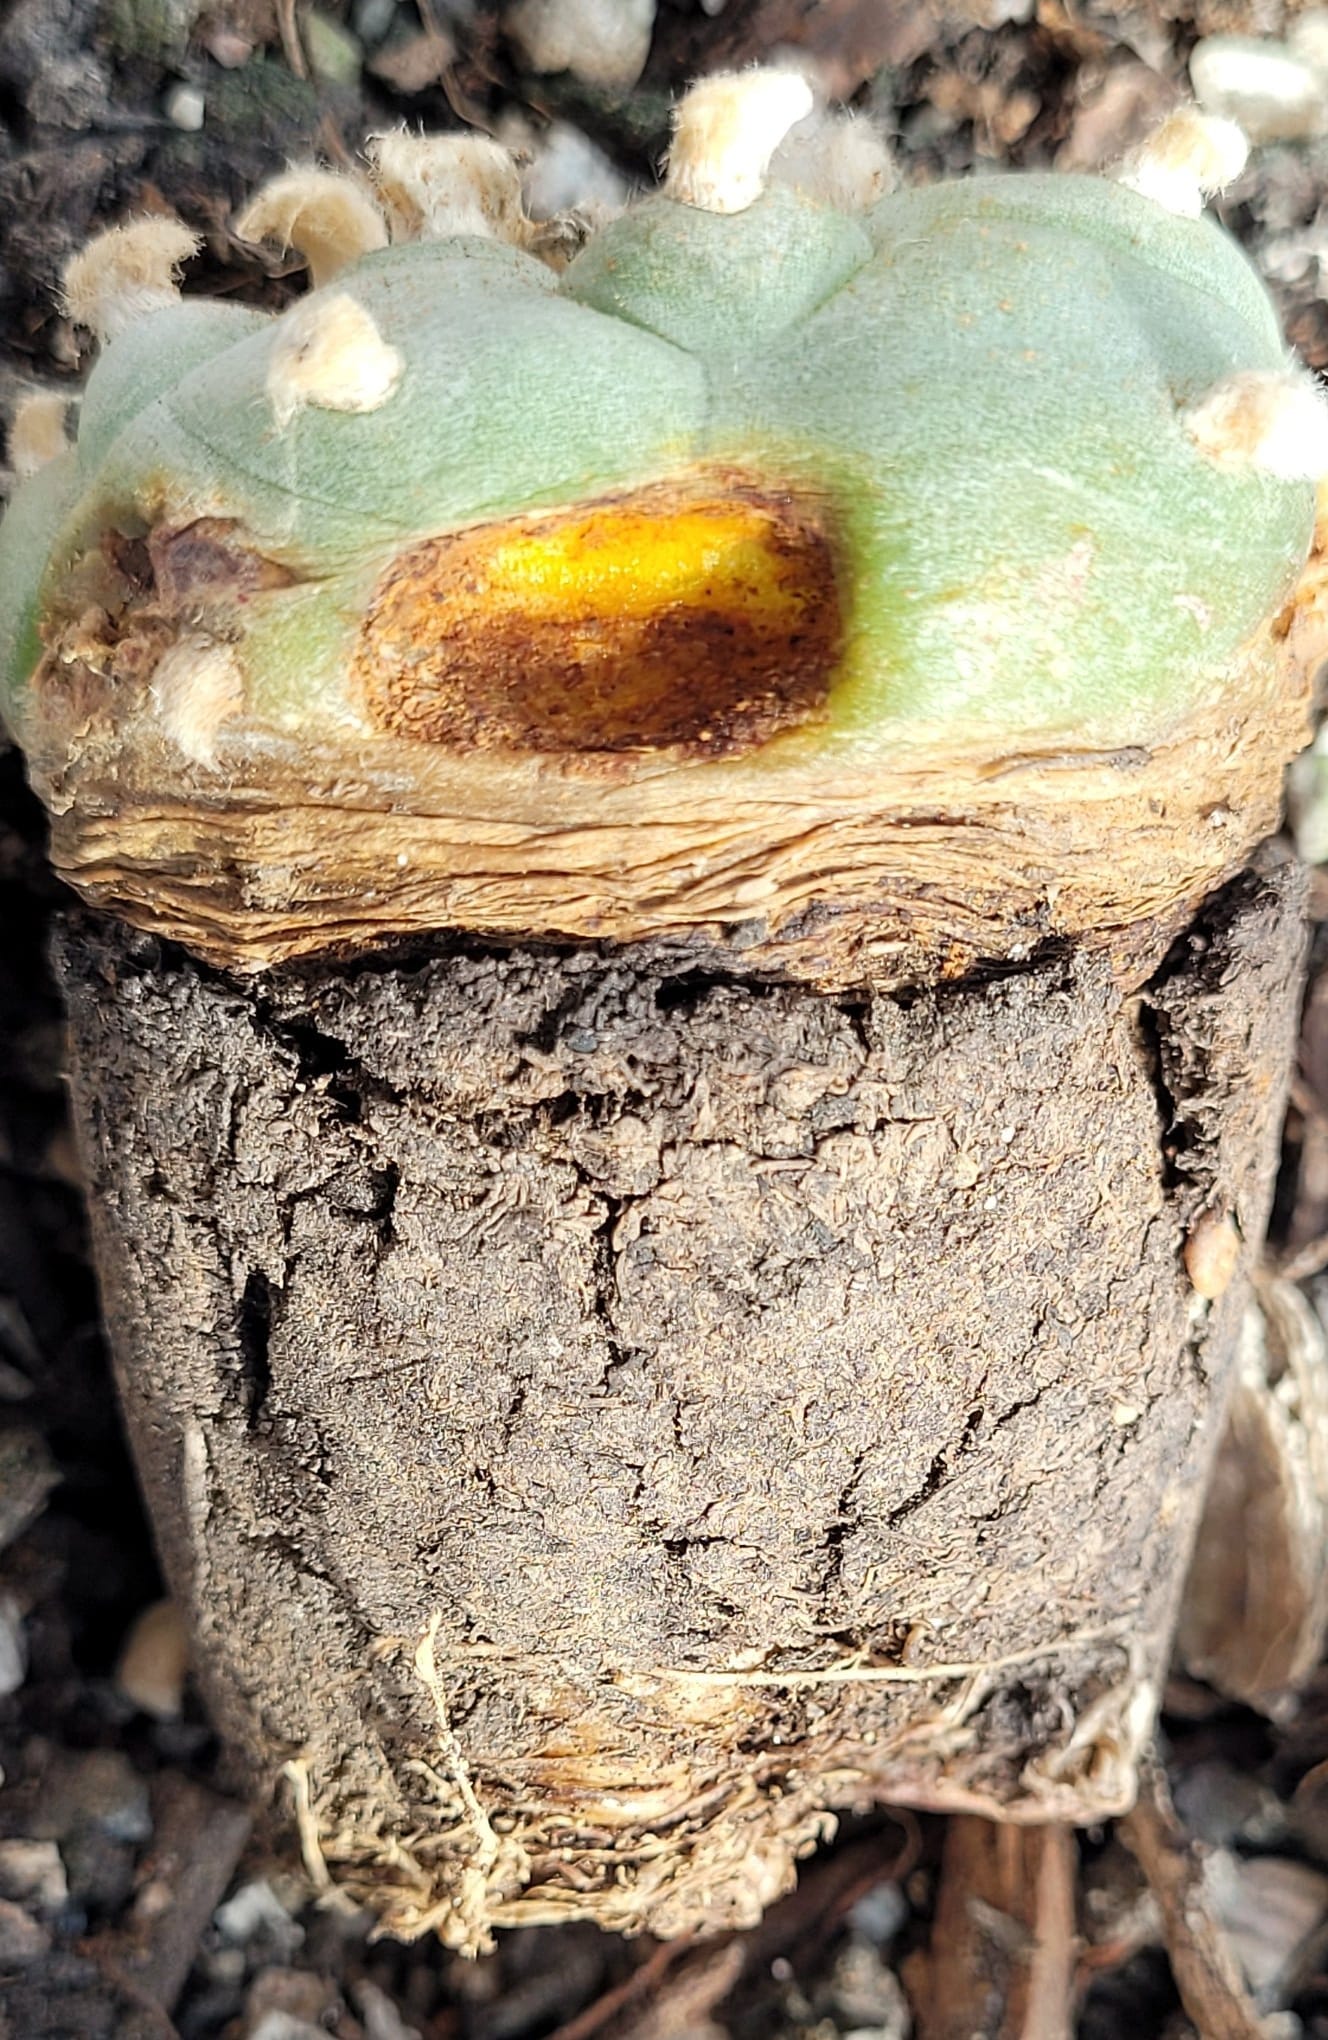
A soft base is the worst-case finding and the most common cause of death in cultivated cacti. The plant lifts free of the substrate with no resistance. The basal tissue is brown or black and gives under your thumb. There is often a foul odor. You are dealing with one of four pathogens or a combination of them.
Fusarium oxysporum produces dry rot and soft rot and has been documented on Mammillaria, Echinocactus, Ferocactus, Astrophytum, Gymnocalycium, Notocactus, Echinocereus, Cereus, and Opuntia. Phytophthora cactorum is an oomycete (not a true fungus) first described as a cactus pathogen in 1870 and now confirmed across 200+ host species in 54 plant families. It produces rapid collapse and water-soaked basal lesions. Pythium species kill the feeder roots first; the cortex separates from the vascular tissue when you tug. Rhizoctonia solani is less common in cacti but produces visible web-like fungal strands at the crown.
The popular framing that “overwatering kills cacti” is imprecise. The kill mechanism is anaerobic waterlogging plus low soil oxygen, which lets the pathogens above bloom. A cactus watered heavily in fast-draining mineral substrate at peak summer temperature rarely rots. The same volume in organic-heavy potting mix at 10°C is frequently lethal. Cold and wet together is the trigger.
Predisposing conditions: container too large for the root mass, soil that holds moisture for more than ten to twelve days, watering during winter dormancy, or any commercial cactus mix containing peat or bark. Recovery protocol is in the dedicated section below.
Symptom 2: Shriveling, Wrinkled Skin
A shriveled cactus with deeper ribs than normal looks dramatic but is rarely an emergency. The body is using its stored water reserves because none is reaching the roots. There are two possible reasons. Either the plant has been left dry too long, or it has lost the roots needed to absorb water that is present.
Diagnostic: water once and wait a week. A truly underwatered plant begins to plump within seven to ten days. A plant with damaged roots stays shriveled because the absorption pathway is broken; it may also begin to rot at the base if the dead root mass holds moisture against the stem. If the plant fails to plump after a careful watering, unpot it and inspect the roots.
Healthy cactus roots are firm, white to cream, and branched. Dead roots are brown, papery, and pull away easily. Soft brown roots that smear under finger pressure are rotted. If more than half the root system is gone, treat as root rot and follow the recovery protocol; if a partial root system survives, repot into dry mineral substrate and resume watering only after two weeks.
True dehydration is rare in well-cared-for plants because cacti store water for months. Severe shriveling in a plant that has been watered regularly almost always means root failure rather than a missed watering.
Symptom 3: Yellowing from the Bottom Up
Uniform yellowing of the body without localized spots points to chlorosis: the plant cannot mobilize the nutrients it needs even if they are present in the substrate. Two failure paths produce this symptom. The first is iron lockout in alkaline substrate. Iron becomes insoluble at substrate pH above 7.5, which happens routinely in limestone-chip mixes and in hard-water irrigation areas. The second is root damage: rotted or absent roots cannot take up anything, and the body yellows uniformly even when nutrients are abundant.
Diagnostic: in true iron chlorosis the rib ridges stay slightly greener than the rib faces (an interveinal pattern, in cacti adapted to ribs rather than leaves). Root-damage chlorosis is uniform and is usually accompanied by a plant that wobbles in the substrate when you nudge it.
Test substrate pH with a basic horticulture meter; most cacti want 6.0 to 7.0. If alkaline, apply iron chelate (Fe EDDHA is effective up to pH 9.0) as a soil drench in evening to prevent photodegradation, or a foliar iron sulfate spray. If the substrate has been over-fertilized with nitrogen, flush with clean water and withhold fertilizer for six weeks. If the roots are gone, address that first; no foliar treatment compensates for an absent root system.
Symptom 4: Brown or Black Spots on Hard Tissue
Localized brown or black spots on tissue that remains firm have three likely causes. Sunburn is the simplest: pale to brown patches on the south or west face after a sudden change in light, with sharp boundaries and dry texture. The damage is permanent (chlorophyll and carotenoid photodamage does not recover) but does not progress as long as the tissue stays hard. Move the plant to shade cloth at 30 to 50% reduction and reacclimate over four to six weeks, adding thirty minutes of direct sun per week.
Fungal lesions look similar but appear on any face of the plant, not only the sun side. Bipolaris cactivora produces yellow water-soaked spots that turn brown and dark within a week and can kill seedlings in four days. Anthracnose (Colletotrichum) produces moist brown rot with pink pustules. Cut out infected tissue with a sterile blade, treat with copper fungicide, and reduce canopy humidity. There is no satisfactory chemical cure once the infection is established; sanitation and cultural control matter more than spray choice.
Pest damage produces yet another pattern. Spider mites (Tetranychus urticae) leave fine webbing at the apex and bronze stippling on the epidermis; the plant looks rust-coloured from across the room. Cactus scale (Diaspis echinocacti) appears as circular white armoured scales clustered near areoles. Mealybugs leave white cottony masses in spine axils. All three are treatable, but the order matters: identify the pest first, then select a control method that does not destroy the natural enemies you need to keep populations down long term.
Bifenthrin and other pyrethroids are widely sold for these pests and they do work as a contact kill, but University of California IPM has documented that pyrethroid use on scale and mites destroys predatory mites and parasitoid wasps, often triggering a worse secondary spider mite outbreak within weeks. Use it only as a last resort. Imidacloprid as a systemic soil drench is more selective; neem oil and insecticidal soap handle light infestations without the rebound risk. Do not apply imidacloprid to plants in bloom or immediately pre-bloom because it translocates into nectar and harms native pollinators.
Symptom 5: Pale, Stretched Growth
Pale, soft new growth that is narrower than the established body and leans toward the nearest window is etiolation: chronic light starvation. Auxin redistribution drives rapid elongation as the plant searches for a usable light source. Indoor cacti placed away from direct sun receive 200 to 500 lux on a typical windowsill; open desert habitat delivers 10,000 to 80,000 lux. Even a bright interior position falls short of what most desert genera evolved to handle.
Diagnostic confirmation is the contrast between old and new growth. The mature body has tight ribs, dense spination, and saturated colour. The etiolated zone is paler, ribs are shallower and more widely spaced, and spines are reduced. The shape elongates asymmetrically toward whatever light there is.
The bad news: the etiolated tissue is permanent. Moving the plant back to full sun stops the further damage but does not compact the stretched growth. The aesthetic remedy is to cut above the etiolated zone with a sterile blade, allow the cut to callus, and reroot the firm upper section. Accept the loss of the stretched lower body. For the future, supplement with a 5,000 to 7,000 Kelvin grow light running twelve to sixteen hours per day, or move the plant outdoors for the growing season and acclimate gradually to full sun in spring.
Symptom 6: Corking at the Base
Corking is the symptom collectors most often misread as disease. Brown, bark-like tissue appears at the soil line on a mature plant and works upward over months. The colour is alarming if you have not seen it before. The tissue is firm under thumb pressure, which is the diagnostic distinction. Press it. If it gives at all, it is rot. If it stays solid, it is corking, and corking is a normal age-related process.
Cells deposit suberin (a waxy polymer) in response to UV exposure, mechanical stress, and the increasing weight of a maturing body. The corked tissue functions as protective bark. It does not spread fast (this is a months-long process), it does not start mid-body or at the apex, and the plant above the corked zone stays fully turgid and healthy. On a long-cultivated specimen of any sun-loving genus, corking is a sign of age, not a problem to solve.
How do you inspect cactus roots for rot?
If symptom 1 or symptom 2 fits, the next move is unpotting the plant and looking at the roots directly. Most growers avoid this because it feels invasive. It is the highest-information action you can take and a healthy cactus tolerates an annual root check without complaint.
Hold the plant with leather gloves or a folded newspaper sling. Tip the pot and slide the root ball out; gently shake or brush off the substrate. Inspect the root architecture under good light. A healthy root system is white to cream, branched into fine feeder roots, firm, and free of foul odor. A failing system is dark brown or black, soft or hollow, smells sour, and lacks the fine feeder branches because the pathogen has dissolved them.
Cactus species with extensive seed grown root architecture (see seed grown roots compared to grafted) absorb water more reliably and recover from rot better than grafted stock that has been removed from the rootstock. Lophophora and Ariocarpus build a single deep taproot that is the load-bearing anatomy of the plant; if the taproot is rotted, the plant cannot be saved by trimming feeder roots alone. Mammillaria and most globular genera build a shallow fibrous mat that recovers more easily from partial loss.
How do you save a dying cactus?
Saving a dying cactus means cutting away the rot, drying the wound and re-rooting the healthy tissue, and this protocol applies once symptom 1 (root rot) or a partial-root case from symptom 2 is confirmed. Time matters. Start within 24 to 48 hours of finding the rot. Sulfur powder is the preferred wound treatment over hydrogen peroxide; H2O2 damages meristematic cells at the callus edge while sulfur protects without that tradeoff.
- Unpot and inspect. Tip the plant out, brush off all substrate, and look at the entire root system in good light. Identify the rot line, where dead brown tissue meets clean white or green flesh.
- Sterilize a blade. Wipe the cutting edge with 70% isopropyl alcohol. Re-wipe between every cut so you do not transfer pathogen from a discarded section to the live tissue.
- Cut above the rot. Slice horizontally well above the visible rot margin. Examine the cross-section: it must show clean, white or pale-green, dry tissue with no brown or orange staining and no foul odor. If any discolouration remains, cut again a few millimetres higher.
- Dust with sulfur powder. Coat the entire cut surface with horticultural sulfur. This protects against secondary fungal entry while the tissue callouses. Skip rooting hormone at this stage; cacti callous and root reliably without it, and rooting hormone on soft tissue invites pathogen colonisation.
- Set the cut to callus. Place the trimmed plant on a dry shelf in shade with airflow. Do not put it in substrate yet. Thin-stemmed species need one to two weeks of callus time. Thick columnar specimens may need one to three months. The cut surface should become dry, hardened, and corky before any contact with moisture.
- Wait for root primordia. Tiny white bumps form along the callus edge at twelve to eighteen days under good conditions. These are the new root initials. Their appearance is the signal that the plant is ready to return to substrate.
- Repot into mineral substrate. Use a 60-70% mineral, 30-40% quality cactus compost mix. Approved mineral aggregates are pumice, granite grit, decomposed granite, lava rock, and limestone chip where the species tolerates alkalinity. Do not use perlite, coarse sand, or peat moss; these compact, retain moisture too long, and break down into root-suffocating paste over time. The container should be sized to the root mass, not the body. Excess soil volume is a rot risk.
- Wait two weeks before watering. Set the repotted plant in bright shade and leave it dry. Watering immediately after repotting is the most common way to lose a plant that survived everything else.
- Resume watering carefully. First watering is light: enough to moisten the substrate without saturating it. Wait until the substrate dries fully before the next watering, typically five to ten days at room temperature. Watch for new growth at the apex over the next four to six weeks; this confirms the rooting succeeded.
Most rescues on this page trace back to one watering decision repeated too often; our guide to how often to water a cactus is the page that prevents the next one.
Rare Cactus Vulnerability Notes
Generic cactus care advice averages across the family. Serious collectors deal with genera that diverge sharply from the average, and the divergence usually pushes the rot risk higher. A short round-up of the genera most worth knowing about.
Ariocarpus is the highest-stakes case. The genus builds an enormous taproot relative to the visible body and the root neck is the first thing to fail. A single watering at 8°C in winter can trigger irreversible Phytophthora crown rot. Standard practice is complete dryness October through March in the northern hemisphere, watering only in the active April to September window, and adding limestone chips to the substrate, a grower convention rather than a proven need. Hard tap water already supplies calcium and bicarbonate at every watering; rainwater and RO water supply neither, so your water is the biggest variable in whether those chips earn their place.
Turbinicarpus and the small geophytic miniatures share a different vulnerability. The narrow root-stem junction is structurally weak and rots first. Damage there is invisible until the body becomes loose in the substrate. Annual repotting with a careful inspection at the neck is the only reliable early warning.
Mammillaria as a genus is moderately rot-tolerant, but the geophytic species (M. pectinifera, M. solisioides, M. luethyi) are the riskiest plants in any collection. Commercial growers frequently graft M. pectinifera to reduce losses; the narrow taproot neck is so prone to rot that ungrafted specimens have a survival rate measured in single percentage points after five years for most growers. Mineral substrate and low humidity (around 40%) are non-negotiable.
Aztekium is the slowest-growing cactus genus on Earth. Seedlings cannot tolerate any dry-out until they reach significant body mass, which can take five to ten years. Growers maintain young Aztekium in near-sealed containers with constant high humidity until they are old enough to handle normal drying cycles. The genus inverts the standard cactus care advice for its first decade of life.
Copiapoa sits at the other end of the rot-vulnerability scale. The genus evolved on the fog-fed Atacama coast and expects almost no soil moisture; it gets its water from coastal camanchaca fog and dew. Copiapoa in cultivation rarely rot when grown in sharp mineral substrate (decomposed granite plus pumice, no organic matter), but they are sensitive to root crowding and to organic-rich potting mixes that hold winter moisture against the body.
Lophophora builds a large carrot-shaped taproot that stores months of water. The thin epidermis over a substantial water-storing parenchyma is structurally vulnerable. Slow growth means rot losses are essentially permanent (the plant rarely recovers enough mass to replace what was cut). Mineral substrate, neutral to slightly alkaline pH, and a dry October-to-March rest are the standard regime.
Frequently Asked Questions
How do you diagnose a dying cactus?
Start with the squeeze test at the base. If the tissue yields under thumb pressure, the cause is root rot and the recovery window is days. If it stays firm, work through the six visible symptoms (mushy base, shriveling, yellowing, hard dark spots, pale stretched growth, basal corking) until one fits. Each symptom maps to a different mechanism: root rot, root damage or underwatering, chlorosis, sunburn or pest damage, etiolation, or normal age corking. Five of the six are problems; corking is not.
What are the signs of root rot in a cactus?
Soft, browning, or blackening tissue at the base; the plant lifts free of the substrate with no resistance; a foul odor near the soil line. Cross-sectioning the base shows brown or orange discolouration advancing inward through the vascular tissue. Pathogens involved are Fusarium, Phytophthora cactorum, Pythium, and Rhizoctonia, often in combination. Phytophthora produces the fastest collapse; Fusarium is slower and more often dry.
Why is my cactus turning soft and mushy at the base?
Anaerobic waterlogging at the root zone has triggered a fungal or oomycete bloom. The framing “overwatering killed it” misses the mechanism: the killer is low soil oxygen plus pathogen activity, not water volume per se. Predisposing conditions are organic-heavy substrate that holds moisture for more than ten to twelve days, oversized containers, watering during winter dormancy, and cold combined with wet (10°C and saturated soil is the lethal combination for most desert genera).
How do you revive a cactus that has been overwatered?
Unpot immediately, brush off all substrate, and inspect the roots. If most are still firm and white, repot into dry mineral substrate and wait two weeks before watering. If more than half are brown or hollow, treat as full root rot: cut above the rot line with a sterile blade until the cross-section shows clean white or pale-green tissue, dust the cut with sulfur powder, callus the cut on a dry shelf for one to three weeks, then repot once root primordia appear at the callus edge.
What is the difference between an underwatered and overwatered cactus?
An underwatered cactus is shriveled but firm; ribs deepen, the body feels light, and the plant plumps within seven to ten days after a careful watering. An overwatered cactus is soft at the base, often discoloured, and frequently smells. It does not recover from a watering because the absorption pathway has already broken. The tactile difference is the fastest diagnostic: shriveling is firm, rot is soft. If both are present, treat as rot first.
Should I cut off the rotted part of my cactus?
Yes, if the plant has any chance of survival. Use a sterile blade wiped with 70% isopropyl alcohol; cut horizontally well above the visible rot margin; check the cross-section for clean tissue and re-cut higher if any discolouration remains. Dust the cut with horticultural sulfur powder rather than hydrogen peroxide; H2O2 damages the meristematic cells that form the callus. Set the cut piece on a dry shelf for one to three weeks until a hard callus forms, then repot once tiny white root primordia appear along the callus edge.
Kamali-Sarvestani, M. et al., “Fusarium and Neocosmospora Species Associated with Rot of Cactaceae and Other Succulent Plants,” Journal of Fungi 8(4), 2022 (PMC9024871) · California Department of Food and Agriculture Plant Pest Diagnostics, Phytophthora cactorum Pest Rating, 2020 · Pacific Northwest Pest Management Handbooks, Oregon State University Extension · Michigan State University Extension, Root Rots: Can You Tell the Difference? · Texas A&M AgriLife Extension, Plant Disease Handbook: Cacti and Succulents · University of Illinois Extension IPM, Soft Rot RPD 943 · University of California Statewide IPM Program (UC IPM), Pest Notes PN7408 (Scales) and PN74174 (Mealybugs) · Cornell University NYSIPM, Phytoseiulus persimilis Predatory Mite Biocontrol Fact Sheet · NC State Extension Publications, Root Mealybugs · ResearchGate / Neotropical Entomology, Efficacy of biorational insecticides against Diaspis echinocacti, 2023 · USDA ARS, Reitz & Funderburk, Management Strategies for Western Flower Thrips, 2012 · Henry Shaw Cactus and Succulent Society, Ariocarpus retusus Plant of the Month · Schulz, R. and Kapitany, A., Copiapoa in Their Environment, 1996 · Anderson, E.F., The Cactus Family, Timber Press · Hunt, D., The New Cactus Lexicon, DH Books · Pilbeam, J., Mammillaria: The Cactus File Handbook, Cirio Publishing